安装
1 安装 vue-cli
1 | npm install -g @vue/cli |
2 安装 node-gyp 所需编译工具
安装 Visual Studio Community 2017
安装 Python2.7(node-gyp 不支持 3.x)
打开 cmd, 执行如下命令
1 | npm config set python python2.7 |
3 修改镜像地址为阿里源
1 | npm config set registry https://registry.npm.taobao.org/ |
vue create 命令
vue-cli 使用 vue create <projectName>新建项目
1 | vue create myApp |
注: 在 vue-cli2 中,使用 init 命令新建项目
1 | vue init <template-name> <projectName> |
如希望在 vue-cli3 中使用 init 命令,则需安装桥接工具
1 | // 安装@vue/cli-init |
创建项目
用 vue create 命令新建项目
1 | vue create hello-world |
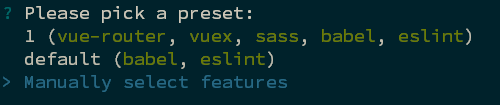
vue-cli 会提示选择默认配置/手动选择配置(上下方向键移动光标 回车确定)
这里选择 Manually select features
启用哪些功能(上下方向键移动光标 空格选择对应的功能 回车确定)
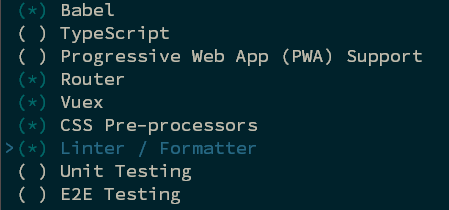
选项说明
1 | Babel Es6 to Es5 |
设置 Vue-Router,是否使用 history 模式,选否

Vue-Router 有两种路径模式, hash 和 history
默认为 hash 模式(用"#"号模拟 url 路径)
hash 模式
1 | // 对应的url |
history 模式
1 | // 对应的url |
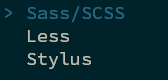
设置 CSS 预处理器,选择 SCSS
设置 EsLint 规范,这里选择 ESLint + Prettier
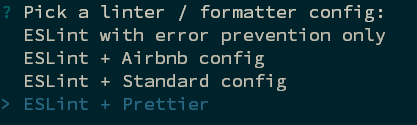
1 | ESLint with error prevention only // 仅检查语法错误 |
风格标准
是否自动修复代码错误, 选择 Lint on save,仅检查

如何储存配置文件,选择 In dedicated config files

In package.json 选项把 eslintConfig browserslist 等配置保存到 package.json 文件
In dedicated config files 选项把配置保存到单独的文件(如 .eslintrc.js)
储存本次选项配置

项目配置储存在 C:\Users%username%.vuerc 中,可用 vue config 命令查看
下次安装时,用 -p <配置名> 命令使用本次配置
1 | vue create projectname -p 1 |
安装完成后,使用 yarn serve 命令启动
监控配置文件更新
更改 vue.config.js|.eslintrc.js 等配置文件后要手动重启,配置才能生效
如希望自动重启 vue-cli,可以借助 nodemon
先安装 nodemon
1 | yarn add nodemon --dev |
示例
然后修改 package.json 的配置
vue-cli3
1 | { |
vue-cli2
1 | { |
watch 参数后的文件名就是 nodemon 所监控的文件.需监控多个文件的话,重复配置多个 watch 参数即可
1 | { |
最后用 yarn watch 命令启动服务.当 config 文件被更改时,nodemon 会重新执行参数 exec 后的命令
模拟 JSON|JSONP 数据
编写项目时,可能需要一些假的 api,供 vue 调用
可以通过 express 和 axios,返回虚拟的 api 数据
vue-cli3 vue.config.js 示例
1 | const express = require("express"); |
代理设置
vue-cli 3.x配置跨域代理 - 个人文章 - SegmentFault 思否
如果嫌 Webpack 启动速度慢, 每次修改 api 之后都要重启很浪费时间的话,可以用 express 开一个指向另一个端口的服务(127.0.0.1: 8000),让 webpack 代理'/api/...'部分的 url 到这个 8000 端口
一个 express 服务的例子:
创建 express.js
1 | const express = require("express"); |
start-express.bat, 用于启动 express.js 的文件
1 | REM 使用nodemon监控express.js内容变化,自动重启 |
vue.config.js 配置
1 | // 如果非生产环境,则代理'/api'到'http://127.0.0.1:8000' |
Prettier 规则设置
本文用 vue create 创建项目时,eslint 选择的是 ESLint + Prettier
Prettier 的默认规则和 vue 有些不同(例如 vue 不建议用分号结尾),建议按照自己的代码风格更改规则设置
Prettier 的规则应放在根目录下.prettierrc.js 文件中(没有的话需自己建一个),而不是.eslintrc.js
示例
1 | module.exports = { |
注意 修改.prettierre.js 配置后,需重启 webpack 才能生效
更多设置见 prettier 官方文档
路径别名
vue-cli3 在 vue.config.js 设置
1 | const path = require("path"); |
vue-cli2 则在 build/webpack.base.conf.js 中设置
1 | module.exports = { |
style 中图片的路径别名
假设该 vue 项目有以下目录结构
1 | - src |
且该 vue 项目在 vue.config.js 中声明了路径别名 common
1 | module.exports = { |
但要是在 group.vue 里用如下方式载入 bg.jpg,则会报错提示找不到图片
1 | <style> |
这是因为 vue-html-loader 和 css-loader 会将"非根路径"转化为"相对路径",如需将其视为模块,则需要在路径前加上~号
1 | <style> |
另外,在<script>标签中 import 载入的的 CSS 内,不需要这样做
Vue2 模板中的图片地址如何使用 webpack 定义的别名? - 前端开发 - SegmentFault 思否
基础路径
注:
Vue CLI 3.3 开始 baseUrl 被抛弃,使用 publicPath 代替. 配置参考 | Vue CLI
vue-cli 默认页面会部署在根路径下, 例如: www.example/index.html
如果需部署在其他子路径下, 如 www.example/exp/index.html
可以使用 baseUrl 属性更改基础路径配置
1 | module.exports = { |
在 js 中,可通过环境变量 BASE_URL 来获取基础路径. 环境变量和模式 | Vue CLI
1 | process.env.BASE_URL |
如果需要用 import 载入 scss,同时又希望把图片等资源放在 public 文件夹下.则可以设置一个全局变量供 scss 使用.
(生产环境和线上环境的 url 子路径可能不同,最好不要把基础路径直接写在 scss 里)
1 | const baseUrl = process.env.NODE_ENV === "production" ? "/Lactuca/" : "/"; |
使用方式
1 | body { |
判断环境模式
常用的模式有
- development 对应 yarn serve
- production 对应 yarn build
在 vue.config.js 中,可用 process.env.NODE_ENV 变量判断当前的环境模式
1 | module.exports = { |
使用 Vscode 调试 Vue 程序
首先, 安装 Vscode 扩展Debugger for chrome
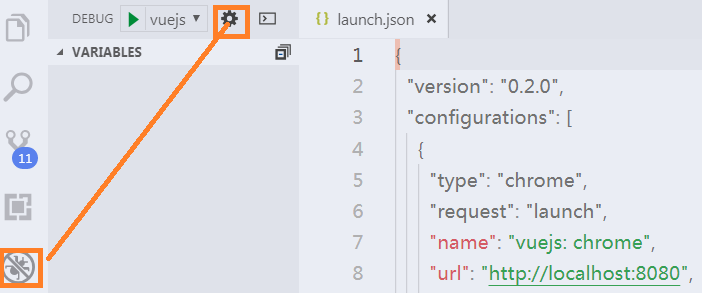
安装完成后, 依照上图所示, 点击 Vscode 左侧的 Debug 按钮,进入调试页面.
然后点击左上方齿轮图标, 在弹出的 launch.json 中填入如下配置:
1 | { |
开启 source-map
有时候不知道为什么 source-map 没有被自动启动, 这时就需要设置 configureWebpack 来激活 source-map.
Source-maps not enabled by default · Issue #1806 · vuejs/vue-cli · GitHub
vue.config.js:
1 | module.exports = { |
开启/不开启 source-map 的区别是什么?
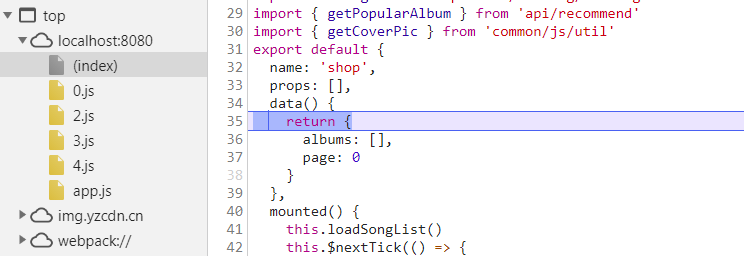
如下图所示,在 Vscode 安装 Debugger for chrome, 然后设置一个断点.
然后 start debugging 按钮, 观查开启/关闭 source-map 时, 断点代码的区别
已开启 source-map:
未开启 source-map:
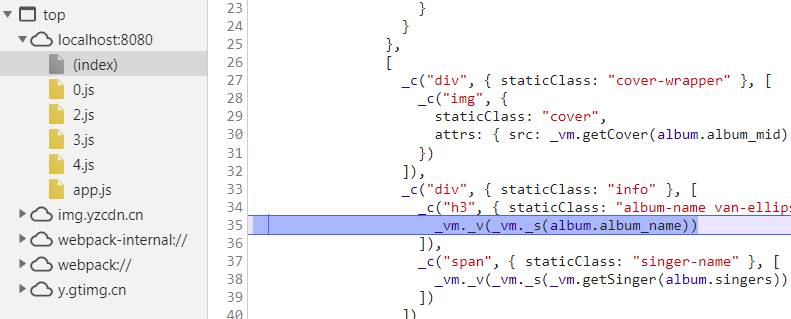
通过上面两张图可知, 开启 source-map 时, 中断位置的代码和原始代码一致.
而未开启 source-map 中断位置的代码是被编译过的,基本没法 debug.
参考
Vue CLI 3 搭建的项目中路径相关问题 - 个人文章 - SegmentFault 思否
vue-cli 中 process.env.NODE_ENV | 雨田
**dirname **filename process.cwd() ./ ../ 的区别
path.join 和 path.resolve 的区别 stackoverflow
webpack devServe 官方文档
vue-cli3 官方文档
nodemon 官方文档
整理 node-sass 安装失败的原因及解决办法
node-gyp 官方文档 安装 windows 下
监控 vue.config.js 变化自动重启