Mocha 是一个功能丰富的 JavaScript 串行测试框架.支持多种运行环境,可以在 Node.js 和 浏览器 中运行.
官网文档
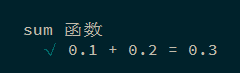
下面是针对 sum 函数创建的一个测试案例:
1
2
3
4
5
6
7
8
9
10
const sum = (a, b ) => { const num = a + b; return parseFloat (num.toPrecision (15 )); } describe ('sum 函数' , () => { it ('0.1 + 0.2 = 0.3' , () => { expect (sum (0.1 , 0.2 )).to .equal (0.3 ); }) });
运行结果:
另外, 上面代码中的断言(expect)来自于 chai , 而非 Mocha. Mocha 没有内置断言库, 需要自己载入.
官方推荐的断言库
什么是断言?
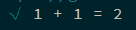
1
2
3
4
5
6
7
8
const sum = (a, b ) => { const num = a + b; return parseFloat (num.toPrecision (15 )); } it ('测试 sum 函数' , () => { expect (sum (1 , 1 )).to .equal (2 ); })
创建 测试用例(test case).
1
2
3
4
5
6
7
8
const sum = (a, b ) => { const num = a + b; return parseFloat (num.toPrecision (15 )); } it ('1 + 1 = 2' , () => { expect (sum (1 , 1 )).to .equal (2 ); })
只要测试用例中的一个断言出错,该用例就不能通过测试.
1
2
3
4
5
6
7
8
9
const sum = (a, b ) => { const num = a + b; return parseFloat (num.toPrecision (15 )); } it ('sum' , () => { expect (sum (1 , 1 )).to .equal (2 ); expect (sum (2 , 2 )).to .equal (3 ); })
待测试 :
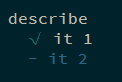
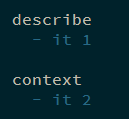
1
2
3
4
describe ('describe' , ()=> { it ('it 1' , () => {}) it ('it 2' ) })
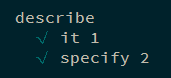
注: 在 Mocha 中, specify 是 it 的别名, 二者作用相同.
1
2
3
4
describe ('describe' , ()=> { it ('it 1' , () => {}) specify ('specify 2' , () => {}) })
创建测试套件(test suite), 单个 describe 中至少应该包含一个或多个 测试用例(it). 测试套件间可以相互嵌套.
例子:
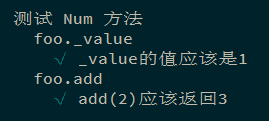
1 2 3 4 5 6 7 8 9 10 11 12 13 14 15 16 17 18 19 20 21 22 23 24 25 26 const Num = value => { return { _value : value, add (value ) { this ._value += value; return this ._value ; } }; }; describe ('测试 Num 方法' , () => { const n = Num (1 ); describe ('foo._value' , () => { it ('foo._value等于1' , () => { expect (n._value ).to .equal (1 ); }); }); describe ('foo.add' , () => { it ('foo.add(2)返回3' , () => { expect (n.add (2 )).to .equal (3 ); }); }); });
什么是测试套件?
例子:
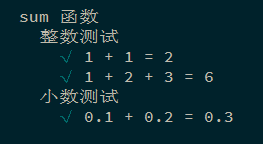
1
2
3
4
5
6
7
8
9
10
11
12
13
14
15
16
17
18
19
20
21
22
23
24
25
26
const sum = (...arg ) => { let num = 0 ; for (let i of arg) { if (typeof i !== 'number' || isNaN (i)) { throw TypeError ('传入的参数必须是数值' ) } num += i; } return parseFloat (num.toPrecision (15 )); } describe ('sum 函数' , () => { describe ('整数测试' , () => { it ('1 + 1 = 2' , () => { expect (sum (1 , 1 )).to .be .equal (2 ); }); it ('1 + 2 + 3 = 6' , () => { expect (sum (1 , 2 , 3 )).to .be .equal (6 ); }); }); describe ('小数测试' , () => { it ('0.1 + 0.2 = 0.3' , () => { expect (sum (0.1 , 0.2 )).to .be .equal (0.3 ); }); }); });
注: 在 Mocha 中, context 是 describe 的别名, 二者作用相同.
1
2
3
4
5
6
describe ('describe' , ()=> { it ('it 1' ) }) context ('context' , ()=> { it ('it 2' ) })
仅执行某些测试套件/用例
如果有很多测试套件/用例,但只想执行其中的几个.这时就可以通过在 describe 和 it 后添加 only 关键字的方式, 来选择需要执行的测试套件/用例.
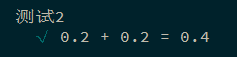
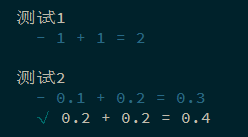
1
2
3
4
5
6
7
8
9
10
11
12
13
14
15
16
17
18
19
const sum = (a, b ) => { const num = a + b; return parseFloat (num.toPrecision (15 )); } describe ('测试1' , () => { it ('1 + 1 = 2' , () => { expect (sum (0.1 , 0.2 )).to .equal (0.3 ); }) }); describe.only ('测试2' , () => { it ('0.1 + 0.2 = 0.3' , () => { expect (sum (0.1 , 0.2 )).to .equal (0.3 ); }) it.only ('0.2 + 0.2 = 0.4' , () => { expect (sum (0.2 , 0.2 )).to .equal (0.4 ); }) });
可以注意到只有最后一个测试(0.2 + 0.2 = 0.4) 被执行, 之前的两个被忽略掉了.
不执行测试套件/用例
作用和 only 正好相反, 通过在 describe 和 it 后追加 skip 关键字, 来跳过某个测试套件/用例.
1
2
3
4
5
6
7
8
9
10
11
12
13
14
15
16
17
18
19
const sum = (a, b ) => { const num = a + b; return parseFloat (num.toPrecision (15 )); } describe.skip ('测试1' , () => { it ('1 + 1 = 2' , () => { expect (sum (0.1 , 0.2 )).to .equal (0.3 ); }) }); describe ('测试2' , () => { it.skip ('0.1 + 0.2 = 0.3' , () => { expect (sum (0.1 , 0.2 )).to .equal (0.3 ); }) it ('0.2 + 0.2 = 0.4' , () => { expect (sum (0.2 , 0.2 )).to .equal (0.4 ); }) });
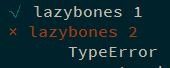
it的回调函数接受 done 参数, 可以通过调用 done() 来表示测试成功, 或传入一个错误 done(Error), 表示运行失败.
1
2
3
4
5
6
7
8
9
10
11
it ('lazybones 1' , done => setTimeout (() => { done (); }, 1000 ); }); it ('lazybones 2' , done => setTimeout (() => { done (new TypeError ()); }, 1000 ); });
即使没有调用 done , 也会因为超时而执行.
1
2
3
it ('lazybones 1' , done => setTimeout (() => {}, 1000 ); });
有一点需要注意的是.只有在接受了 done 作为参数,才会因为没有调用 done 而超时报错.
1
2
3
it ('done => {}' , done =>it ('() => {}' , () => {});
对于Promise, 可以直接将其返回. 通过在 Promise.then 中执行断言来判断是否执行成功.
1
2
3
4
5
6
7
it ('return Promise' , () => { return new Promise ((resolve, reject ) => { setTimeout (() => resolve (1 ), 10 ); }).then (num => expect (num).to .equal (1 ); }); });
注意: 不要在传入 done作为回调参数 的同时 返回 promise,这会导致错误(不同版本可 Mocha 可能有改动):
1 Error: Timeout of 2000ms exceeded. For async tests and hooks, ensure "done()" is called; if returning a Promise, ensure it resolves.
1
2
3
it ('it' , (done ) => { return Promise .resolve () });
Mocha 提供了 before after beforeEach afterEach 四个钩子
1
2
3
4
5
6
7
8
9
10
11
12
13
14
15
16
17
describe ('hooks' , function ( before (() => { }); after (() => { }); beforeEach (() => { }); afterEach (() => { }); });
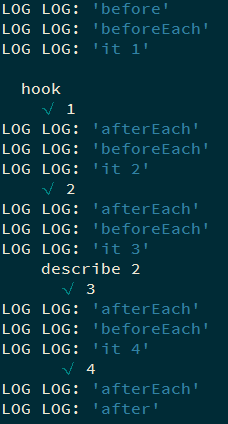
beforeEach 和 afterEach 会在每一个测试用例和测试套件之前执行,对于嵌套的 describe 也是如此.
1
2
3
4
5
6
7
8
9
10
11
12
13
14
15
16
17
18
19
20
21
22
23
24
25
26
27
28
describe ('hook' , () => { before (() => { console .log ('before' ); }); after (() => { console .log ('after' ); }); beforeEach (() => { console .log ('beforeEach' ); }); afterEach (() => { console .log ('afterEach' ); }); it ('1' , () => { console .log ('it 1' ); }); it ('2' , () => { console .log ('it 2' ); }); describe ('describe 2' , () => { it ('3' , () => { console .log ('it 3' ); }); it ('4' , () => { console .log ('it 4' ); }); }); });
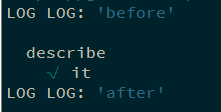
钩子并不一定要放在 describe 里, 也可以直接放在最外层.例如:
1
2
3
4
5
6
7
8
9
10
11
12
before (() => { console .log ('before' ); }); after (() => { console .log ('after' ); }); describe ('describe' , () => { it ('it' , () => { }) });
与异步的测试用例一样, 可以通过 调用 done 或 回传 Promise 来执行异步钩子.
1
2
3
4
5
6
7
8
9
10
11
12
13
let foo;before (done => setTimeout (() => { foo = 'bar' ; done (); }, 10 ); }); describe ('describe' , () => { it ('foo的值应该为bar' , () => { expect (foo).to .equal ('bar' ); }); });
1
2
3
4
5
6
7
8
9
10
11
12
13
14
15
let foo;before (() => { return new Promise ((resolve, reject ) => { setTimeout (() => { foo = 'bar' ; resolve (); }, 10 ); }); }); describe ('describe' , () => { it ('foo的值应该为bar' , () => { expect (foo).to .equal ('bar' ); }); });
与 describe 一样,钩子也可以传入字符串作为第一个参数.便于在出错的时候定位错误:
1
2
3
4
5
6
7
before ('before 1' , () => { throw new TypeError (); }); describe ('describe' , () => { it ('it' , () => {}); });
作为对比,不添加注释时的表现如下:
1
2
3
4
5
6
7
before(() => { throw new TypeError(); }); describe('describe', () => { it('it', () => {}); });
注意: 如果测试套件(describe)中没有测试用例(it), 则测试套件中的钩子不会被执行.
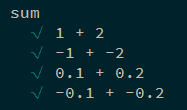
如果需要测试的数据非常多,则可以通过动态生成测试用例来测试代码.
1
2
3
4
5
6
7
8
9
10
11
12
13
14
describe ('sum' , () => { const tests = [ { args : [1 , 2 ], expected : 3 }, { args : [-1 , -2 ], expected : -3 }, { args : [0.1 , 0.2 ], expected : 0.3 }, { args : [-0.1 , -0.2 ], expected : -0.3 } ]; tests.forEach (test => const args = test.args ; it (args.join (' + ' ), () => { expect (sum (...args)).to .equal (test.expected ); }); }); });
如果代码的执行时间较长, 可以通过 this.timeout() 设置超时时间.
没有超时:
1
2
3
4
it ('it' , function (done ) { this .timeout (20 ); setTimeout (done, 10 ); });
超时了:
1
2
3
4
it ('it' , function (done ) { this .timeout (10 ); setTimeout (done, 20 ); });
可以在任意位置调用 this.timeout , 其设置会被嵌套的套件/实例所继承.
1
2
3
4
5
6
7
8
9
10
11
12
13
before (function ( this .timeout (50 ); }); describe ('des' , function ( this .timeout (0 ); it ('it 1' , function ( this .timeout (50 ); }); it ('it 2' , function ( });
注意:
总超时时间 : Mocha - the fun, simple, flexible JavaScript test framework
如果是通过 Karma 调用 Mocha,则需到 karma 的配置文件中配置.
1 2 3 4 5 6 7 8 9 10 11 module .exports = function karmaConfig (config ) { config.set ({ frameworks : ['mocha' , 'sinon-chai' ], client : { mocha : { timeout : 10 } } }) }
todo
测试框架 Mocha 实例教程 - 阮一峰的网络日志 node.js - What is the role of describe() in Mocha? - Stack Overflow mocha - 廖雪峰的官方网站